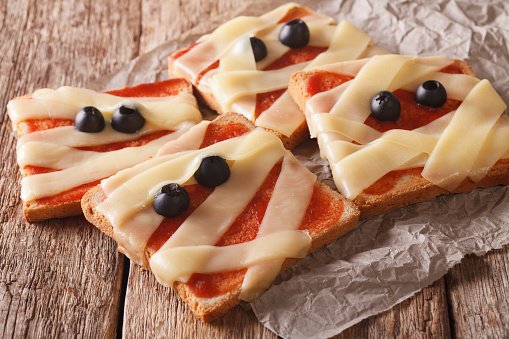
The Mummy Sandwich is a creative, fun, and tasty sandwich that looks like a wrapped mummy, making it especially popular among kids, families, and anyone who enjoys playful food presentation. While it is often prepared for Halloween or themed parties, the Mummy Sandwich is so delicious and easy to make that it can be enjoyed any time of the year. Crispy on the outside, gooey and flavorful on the inside, this sandwich is a perfect mix of fun and comfort food.
What makes the Mummy Sandwich special is its appearance. Thin strips of bread or dough are wrapped around a flavorful filling, leaving small gaps to resemble mummy bandages. Olive slices or peppercorns are often used as eyes, giving the sandwich its signature look. Beyond looks, this recipe is versatile, customizable, and quick to prepare, making it ideal for breakfast, snacks, lunchboxes, or party starters.
🧾 Ingredients (Serves 2–3)
For the Sandwich Base:
- Bread slices (white or brown) – 6
- Butter – 2 tablespoons (softened)
For the Filling:
- Boiled potatoes – 2 medium, mashed
- Onion – 1 small, finely chopped
- Capsicum (bell pepper) – ½ cup, finely chopped
- Grated cheese (mozzarella or processed cheese) – ½ to ¾ cup
- Salt – to taste
- Black pepper – ½ teaspoon
- Red chili flakes – ½ teaspoon (optional)
- Mixed herbs or oregano – ½ teaspoon
For Decoration:
- Black olives – sliced (for eyes)
or - Black peppercorns – 2 per sandwich
👩🍳 Step-by-Step Preparation
Step 1: Prepare the Filling
Start by boiling the potatoes until soft. Peel and mash them smoothly without lumps. Heat a small pan, add a little butter or oil, and lightly sauté the chopped onions until translucent. Add capsicum and cook for 1–2 minutes so it remains slightly crunchy.
Now add the mashed potatoes to the pan. Season with salt, black pepper, red chili flakes, and mixed herbs. Mix well and cook for 2–3 minutes on low flame. Turn off the heat and let the mixture cool slightly. Once warm, add grated cheese and mix well. This creates a creamy, flavorful filling.
Step 2: Prepare the Bread Strips
Take the bread slices and trim off the edges. Using a sharp knife, cut each bread slice lengthwise into thin strips. These strips will act as the “bandages” of the mummy.
Lightly flatten the bread slices (if needed) using a rolling pin. This helps them wrap easily around the filling.
Step 3: Assemble the Mummy Sandwich
Take one full bread slice as the base. Spread a thin layer of butter on it. Place a generous amount of prepared filling in the center, shaping it into a small rectangle or oval.
Now carefully place the bread strips over the filling in a criss-cross pattern, leaving small gaps in between so the filling is slightly visible. Make sure not to cover the entire filling, as the mummy look comes from these open spaces.
Place two small olive slices or peppercorns near the top to create mummy eyes.
Step 4: Toast or Grill the Sandwich
Heat a grill pan or sandwich toaster on medium heat. Grease it lightly with butter. Place the assembled mummy sandwich carefully on the pan.
Toast for 2–3 minutes on one side until golden brown and crispy. Flip gently and toast the other side until the cheese melts and the sandwich turns crisp. If using a sandwich maker, grill until evenly golden.
Be gentle while flipping to maintain the mummy shape.
Step 5: Serve Hot
Remove the sandwich and let it cool slightly. Serve hot with tomato ketchup, mayonnaise, or a cheesy dip. The melted cheese inside, combined with crispy bread, makes every bite irresistible.
🍽️ Serving Ideas
- Serve as a kids’ snack with ketchup
- Add to a party platter with other finger foods
- Pair with soup for a light dinner
- Pack in lunchboxes (wrap in foil to keep warm)
The Mummy Sandwich is best enjoyed fresh and hot for maximum crispiness and flavor.
🌶️ Variations You Can Try
1. Cheese-Only Mummy Sandwich
Skip the potato filling and use only mozzarella and cheddar cheese for a super gooey version.
2. Veggie Delight
Add grated carrot, sweet corn, or finely chopped beans to the filling for extra nutrition.
3. Spicy Indian Twist
Add green chilies, garam masala, and chaat masala for bold Indian flavors.
4. Non-Veg Version
Add shredded cooked chicken or scrambled eggs to the filling for a protein-rich option.
🥗 Health & Nutrition Notes
- Provides energy from bread and potatoes
- Cheese adds calcium and protein
- Vegetables increase fiber and vitamins
- Can be made healthier using brown bread and less butter
For a lighter version, grill with minimal butter and add more vegetables to the filling.
🕒 Storage Tips
- Best eaten fresh
- Can be refrigerated for up to 12–24 hours
- Reheat on a pan or toaster (avoid microwave for crispiness)
- Not suitable for freezing
🌟 Final Thoughts
The Mummy Sandwich is not just food—it’s an experience. Its playful look makes it exciting for kids, while its crispy texture and cheesy filling satisfy adults just as much. Easy to prepare, customizable, and visually appealing, this sandwich is perfect for special occasions or everyday fun meals.
Follow Us On Instagram